Part 1 of ISO/TS 14253 establishes the rules for determining when the characteristics of a specific work piece or measuring equipment are in conformance or non-conformance with a given tolerance (for a work piece) or limits of maximum permissible errors (for measuring equipment), taking into account the uncertainty of measurement.
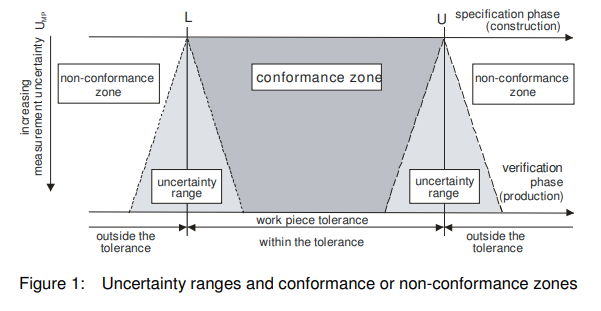
It also gives rules on how to deal with cases where a clear decision(conformance or non-conformance with specification) cannot be taken, i.e. when the measurement result falls within the uncertainty range (see Figure below) that exists around the tolerance limits.

Conformance
Fulfilment of specified requirements.
Conformance zone
Specification zone reduced by the expanded uncertainty of measurement UMP (Figure below).
Note: The specification is reduced by the expanded uncertainty of measurement UMP at the upper and lower specification limits. In case of characteristics with a one-sided specification, this reduction does not apply to the natural boundary side.
Proof of conformance
If the measurement result Y (measured quantity value yi associated with the expanded measurement uncertainty UMP) is lying within the specification zone, the conformance with the tolerance is proved and the product can be accepted.

Non-conformance
Non-fulfilment of a specified requirement.
Non-conformance zone
one(s) outside the specification zone extended by the expanded uncertainy of measurement UMP (Figure 1).
Note: The specification is extended by the expanded uncertainty of measurement UMP at the upper and lower specification limit. In case of characteristics with a one-sided specification, this reduction does not apply to the natural boundary side.
Proof of non-conformance
Non-conformance with the tolerance is proved when the measurement result Y (measured quantity value yi associated with the expanded measurement uncertainty UMP) is lying beyond the specification zone (Figure 3). In this case, the work piece must be rejected.

reference:VDA
